Let’s be honest—for those chilly mornings when your toes hit cold tile, there’s nothing quite like the gentle, radiant warmth rising from beneath your feet. It’s more than comfort—it’s a small daily luxury that makes your home feel more inviting. This guide walks you through electric heated tile floor installation, from understanding the system to sizing the right kit and comparing popular options, all in a calm, manageable way.
What Is Heated Tile Floor Installation?
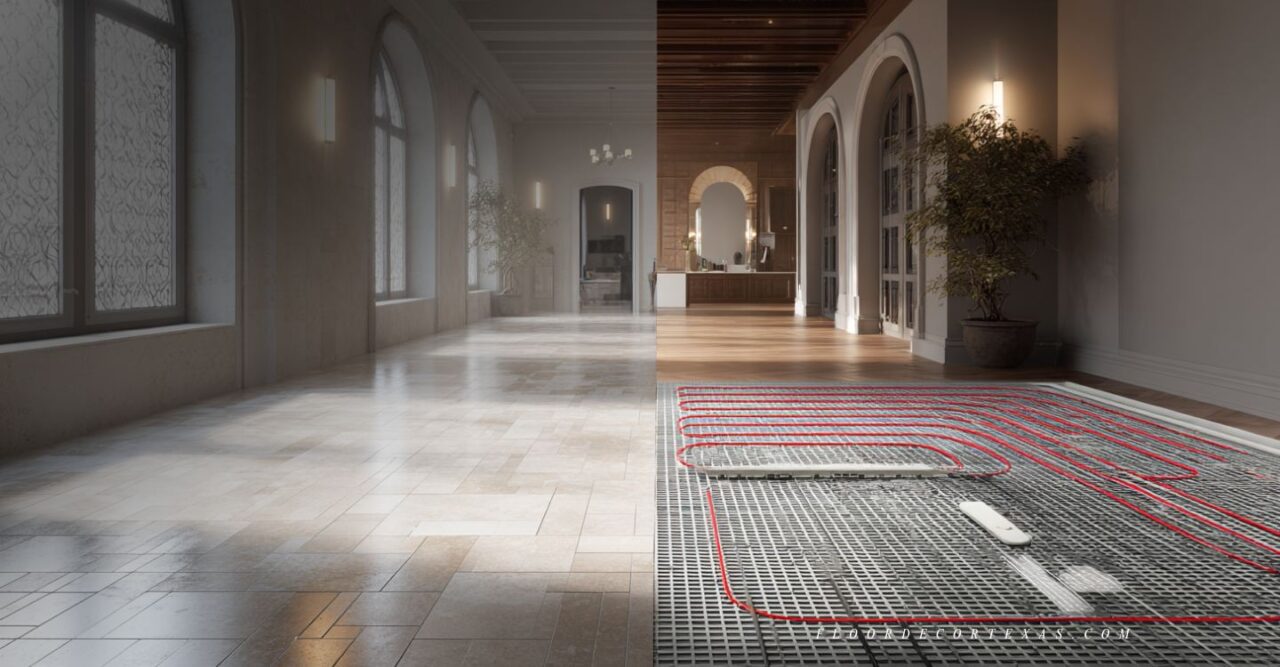
Heated tile floor installation involves placing a radiant heating system—most commonly electric heating mats or loose cables—beneath tile flooring such as ceramic, porcelain, or natural stone. Tile is an excellent conductor and retainer of heat, which is why radiant systems are especially popular in bathrooms, kitchens, and entryways.
Homes that already benefit from durable tile surfaces often pair heated floors with long-lasting materials like stone. If you’re evaluating how different materials respond to temperature changes, our guide on stone floors in cold climates offers helpful insight.
Step-by-Step Electric System Installation
Installing an electric radiant heating system is very achievable with careful planning. Here’s a step-by-step overview:
- Plan & Prepare: Map out the room and mark areas that will not be heated, such as under vanities or tubs. This planning stage is similar to preparing for any flooring installation project.
- Test the Heating Elements: Use a digital ohmmeter before and after installation to confirm the cable resistance matches the manufacturer’s specifications.
- Prep the Subfloor: Ensure the surface is clean, dry, and level. Concrete subfloors may benefit from insulation, especially in colder regions.
- Install the Heating Element: Secure the mat or cable using approved adhesive or tape. Only the mesh is cut—never the heating wire.
- Place the Sensor: Position the thermostat sensor between heating wires so it accurately reads floor temperature.
- Electrical Connections: Connect the system to the thermostat and power supply following code requirements. For safety, many homeowners choose to work with a licensed electrician.
- Final Resistance Test: Perform one last ohm test before tiling to ensure the system wasn’t damaged during installation.
- Lay Your Tiles: Apply thinset and carefully install tile. Design choices matter here—especially in compact rooms. You may find inspiration in our article on how to make small rooms feel bigger with the right tile design.
- Install the Thermostat: After the thinset cures, finish wiring the thermostat and test the system before regular use.
Electric vs. Hydronic Systems
Radiant floor heating generally falls into two categories: electric and hydronic. Electric systems are easier to install and ideal for smaller areas, making them popular for bathroom remodels and targeted upgrades.
Hydronic systems, which circulate warm water through tubing beneath the floor, are more complex but highly efficient for larger spaces or whole-home heating. According to the U.S. Department of Energy, hydronic systems can offer long-term energy savings when paired with proper insulation and efficient boilers.
How to Resize (Size) Your Electric Heating Kit
Choosing the correct kit size is one of the most important steps in a successful heated floor project.
1. Measure the Usable Heated Area
Measure only open floor space—exclude cabinets, toilets, and permanent fixtures. Leave recommended clearances from walls and heat-sensitive areas.
2. Match Available Kit Sizes
Select a kit that closely matches your measured area. Similar to choosing the right tile quantity during a floor measurement process, accuracy prevents costly mistakes.
3. Understand Voltage & Coverage Limits
Most electric mats come in 120V or 240V options. Larger rooms typically perform better with higher-voltage systems.
4. Add a Buffer Zone
Adding roughly 10% extra coverage helps accommodate layout changes and ensures even warmth.
5. Account for Heat Loss
Rooms over garages or with poor insulation may need higher watt density to maintain comfortable temperatures.
What You Need to Start Your DIY Heated Floor Installation
Most electric floor heating kits include the mat or cable, thermostat, and temperature sensor. These systems work best under tile, stone, and other hard surfaces commonly featured in tile flooring installations.
Note: Always verify product specifications before purchasing, as coverage and electrical requirements can vary.
Pro Tips Before You Install
- Timeline: Most installations take 1–3 days, including curing time.
- Floor Height: Expect the finished floor to sit about ½ inch higher than before.
- Efficiency & Comfort: Radiant heat provides even warmth without circulating dust.
- Codes & Permits: Follow the National Electrical Code (NEC) and local regulations. Many thermostats include built-in GFCI protection.
- Warranty Records: Keep documentation of resistance tests—manufacturers often require them for warranty claims.
FAQs
- Can I install this myself?
- Yes, many electric systems are DIY-friendly, though final electrical connections are best handled by a professional.
- Will it increase my energy bills?
- It can slightly, but radiant heat often allows for lower overall thermostat settings, balancing energy use.
- Are heated tile floors safe?
- When installed correctly and tested properly, these systems are extremely safe and reliable.
- What’s the expected lifespan?
- Electric radiant heating systems commonly last 20–30 years.
Finally
Turning cold tile into a warm, welcoming surface isn’t just a practical upgrade—it’s an investment in everyday comfort. With thoughtful planning, accurate sizing, and the right materials, heated tile floor installation can be a rewarding DIY project or a smooth professional upgrade.
Quick recap:
- Measure only usable floor space.
- Select a kit that meets or slightly exceeds your needs.
- Prepare the subfloor carefully.
- Test resistance at every stage.
- Have the final wiring inspected for safety and code compliance.
